In this tutorial you'll show you how to improve the linkage in your HPI Savage. In doing so you'll gain benefits such as; Maximized stopping abilities, enhanced throttle/brake response, and smoother linkage movements.
Parts Needed:
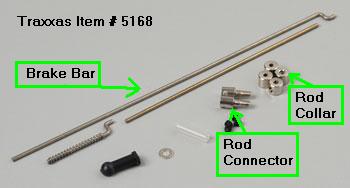
(1) – Traxxas Slide Carb Linkage Kit – Item # 5168
Nitro Fuel Tubing – (about 2 inches)
Servo Tip:
- Replace the stock SF-1 servo with a stronger/faster servo
- Any servo will do as long as it has > 90oz torque @ 6V
- The stock steering servo SF-2 is an excellent choice & it can be found fairly cheap
- If you replace your SF-2 steering servo with a stronger one. You can then use the SF-2 for your throttle/brake servo. This is a common thing to do on many savages.
Brake Tip:
- You can also scuff the brake pads with fine-grit sandpaper or a steel-wool pad.
- This will help eliminate the smooth glaze on them and help improve your stopping power
- This is especially important for aluminum or any other metal brake
Directions:
— As with any set of directions, there are more than one way to do things. So use these as a guideline and use your own judgment when doing your mod. Let’s begin:
Step 1:
— With the engine off.
— Turn on radio & receiver
— Make sure all the EPA & Trims are set to “0†or centered in the middle.
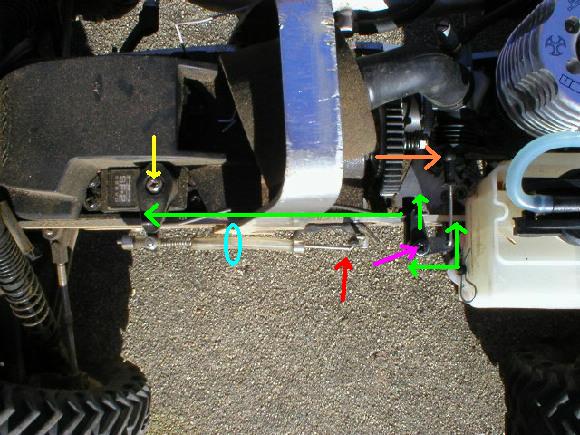
(Step 2 & 3 Pic)
Step 2:
— Time to align your throttle linkages first.
— Unscrew the servo arm from the throttle/brake servo (yellow arrow).
— Align all the throttle linkages so they are all at perfect right angles (green arrows).
— If needed, you can pop off the ball link connector (orange arrow) and spin it on the linkage wire.
— You can spin it to either increase or decrease it’s length, it all depends on how you need to adjust it.
— Once everything is aligned, then screw the servo arm back into the servo (yellow arrow).
— Now double check to make sure that the step screw is not tight (pink arrow).
— Note that the carb should be completely closed at this time and everything still at right angles.
— Now, check your throttle response by squeezing the trigger on the radio and checking to make sure the carb opens fully at WOT and closes when you release the trigger.
Step 3:
— Install your brake system:
— Install your brake bar so the curved part is on the outside of the brake lever (red arrow).
— If the curved part is on the inside, it can cause binding on the roll bar when the brake is applied.
— With the stock setup, the brake bar will hit the roll bar in the location designated by the (blue circle).
(Step 4 & 5 Pic)
Step 4:
— The linkage used is the Traxxas Linkage Kit – Item # 5168
— Attach the following pieces to the brake bar (in this order).
Rod Collar (green arrow)
Fuel tubing (approx 1.5â€) (yellow arrow)
Spring (blue arrow)
Rod Connector (red arrow)
Fuel Tubing (approx ¼â€) (yellow arrow)
Rod Collar (green arrow)
Step 5:
— Cut off the little square part on the bottom of the servo arm. Now carefully, widen (just a little) the plastic hole in the throttle/brake saver to allow the rod connector to slide easily up into the servo arm hole (as seen by bottom red arrow).
— Now attach a nut onto the end of the rod connector to make sure it does not fall out (top red arrow).
— Don’t attach the nut too tight (just enough to keep it from falling off)
— You want the rod connector to be able to pivot freely whenever the brakes are applied.
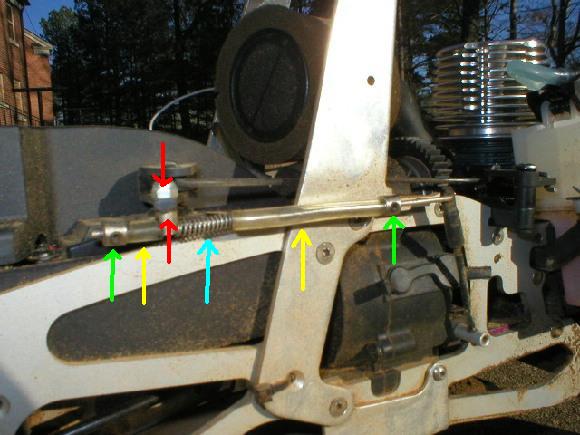
(Step 6-9 Pic)

Step 6:
— Align your brake for maximum stopping power.
— Double check to make sure your radio & receiver are still on by squeezing the gas.
— Now to align your brake. Begin to slide the brake lever forward (as seen by blue arrow).
— Until you feel it (or see it) start to squeeze the brake pads.
— You want to stop right BEFORE you get to the point where the brakes are engaging.
— Now hold the brake lever there and go onto the next step.
Step 7:
— At the other end of the linkage (red arrows).
— Slide the rod collar down toward the rod connector (red arrow).
— Make sure it is flush against the rod connector.
— Now lock down the rod collar by turning the setscrew inside it.
— Lock it tight, but don’t bend the bar trying to lock it.
— You can now release your other hand from the brake lever.
Step 8:
— Now you can slide the other rod collar down towards the rod connector (green arrow).
— Slide it down far enough so the fuel tubing pushes on the spring and actually compresses it (as seen in pic).
— The spring acts to return and keep the brake lever in a neutral position
— The tubing helps the spring and provides a barrier so the brake rod does not bind against the roll bar.
— Metal on metal can cause interference or glitching of your servo.
— Now lock down the rod collar by turning the setscrew inside it.
— Lock it tight, but don’t bend the bar trying to lock it.
Step 9:
— System check:
— Squeeze your brakes a couple of times while pushing the truck to make sure it works properly.
— Make sure they engage.
— Also, make sure they disengage.
— With the radio in neutral, roll the truck on the ground to make sure you don’t feel any tension from the brakes.
— You don’t want any brake drag in neutral or WOT
— If it feels like the brakes are engaged (while in neutral) and the truck is not rolling freely then you need to adjust the rod collar (from step 6).
— Simply slide the rod collar towards the front of the truck until the brake disengages, and then lock it back down.
— You might only need to slide it a millimeter or two.
— Now check to see if you need to adjust the other rod collar (from step 7) in order to keep the tension on the spring.
— Apply the gas and make sure the throttle still opens fully.
— Check complete!
— You can cut off the excess brake bar if you want, just leave about an 1 inch on there in case you need to make adjustments in the future.
Now it’s time to bash, just watch out for that tree!
Thanks to Digital Liquid for submitting this article.